Many people in the UK are BT customers who have had their router upgraded at some point so now have a spare. If you are one of those people who also suffers from poor WIFI signal somewhere in your house follow these step by step instructions to reuse your old router and solve your WIFI problems.
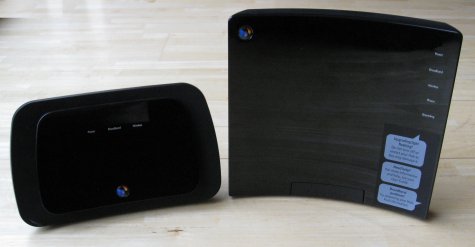
My instructions involve using my old home hub 2 along with my newer Home Hub 3.
The old Home Hub 2 will become a Wireless AccessPoint (AP) and the Home Hub 3 will stay as a router (connecting my home network to the internet). However, I will also explain the principles so that you can extend it to other routers
 |
| BT Home Hub 3 (Left) and BT Home Hub 2 (Right) |
Instructions
Connect Your Old Router
In order to communicate network traffic between the router (that connects to the outside Internet) and your new AP you need to connect them together. There are two main ways of doing this:
- A network cable
- Using a Ethernet over Power (often known as power line)
If you plug in you old router without setting it up first it will conflict with your the new router and you may have difficulties. Until you have done the full setup procedure do not have them both switched on together.
The Cable Option
For the option you just need a CAT5 ethernet cable. Higher performance cables (CAT5e or CAT6) is only required for speeds above 100Mb/s. Most people have an incoming broadband speed of less than 100Mb/s so a faster internal network is only likely to be needed for advanced users. If you plan to do lots of home cabling investing in a tool to make your own cables might be worthwhile but 20M CAT5 cables can cost less than <£10.
 |
| Cabling two Home Hubs together |
If you have wooden floorboards to route them underneath or run it through the loft space. Alternatively you can tuck it under the carpets.
Ethernet over Power
The technology for transmitting network traffic over you internal electricity cabling is amazing. I got a set of PowerLine adaptor with my first BTVision box. I then bought a further one on eBay to extend my network for £15. Failing that, they are available on many internet retailers. If you already have some supplied with the 1st generation BTVision box look for people selling Comtrend Powerline 9020 on ebay to expand your system.
 |
| Connecting your two Home Hubs with Ethernet over Power |
Because I already had two, I just needed one more but then needed to go through the pairing process. These devices use encryption to ensure that they only talk to each other and no-one unauthorised can get at your network traffic. If you already have some you will need to follow the procedure listed in the user manual.
Setup Your Old Router
In order to make these changes you will need to log into your router. Until you have set up the old router as your AP, DO NOT HAVE THEM SWITCHED ON SIMULTANEOUSLY.
If you don't know all the settings you may need to:
- study the settings in your router, write them down;
- turn off the new router;
- turn on the old router enter the settings;
- then turn back on the new router
If you have never looked at the settings in your router(s) get comfortable navigating them and making sure you understand the settings before you start making changes. Your router has a simple webserver built into it that allows you to view and change its configuration. To get to this you simply point your webbrowser at the address of the router whilst your device, e.g. a PC, is connected to the internal network. In my case both of my routers live at the address 192.168.1.254, According to an article on the BT website, all BT home Hubs have this address by default. Because they both have the same address do not have them switched on at the same time until you have reconfigured the AP to a different address.
 |
| Using Internet Explorer to log into the router |
In order to change your old router into a Wireless AccessPoint (AP). You need to change two settings:
- The Wireless settings - You need to make settings on the Router and the AP identical so that you can use either without needing to worry about having to manually change your computer/phone/tablet settings all the time.
- Update the Address allocation to ensure that the two devices don't fight each other.
Wireless Settings
HINT: This process is easier if you are connected to the router using a cable from a PC rather than using WIFI. That way if you make a mistake you'll be able to get back in again easily. You can connect a cable directly to the router from a PC in most cases.
Each WIFI network has the following:
- a name, called Service Set Identifier (SSID).
- a security key used to encrypt your data and minimise the chance of an unauthorised person using your network or stealing your data.
You need to set these settings to the same on both the router and AP to ensure seamless WIFI in your house.
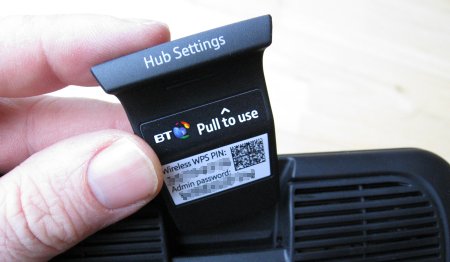
The following steps depends upon whether you use the defaults or if you have changed it. For example you can change the SSID to "Keith House" to make it easier to connecting your devices to the network and set the password to something more memorable. If you haven't changed it the defaults, the SSID, Wireless password and access password to you Home Hub are on a handy tab in the top of BT Home Hub 3 or supplied on a credit card bit of plastic for the Home Hub 2.
 |
| Handy tab on the Home Hub 3 |
To make this process easier I strongly recommend changing the SSID and the security password to something memorable. Once you have found the web login for your router, then press the settings button and proceed to the advanced settings, at one point in this process you will need to enter the administration password for the router. It may also ask you if you are really sure whether to go to the advanced settings, say yes, however, take some time looking before you make any changes.
If you find that the type of wireless encryption is set to WEP or "No Encryption", I strongly recommend changing that immediately to WPA or WPA2. Hackers worked out how to bypass WEP encryption a number of years ago and this is next to useless now.
Get the router set up first then you can mirror the settings on the AP. If you are logged into your router using Wireless and you change either setting you will need to reconnect to it using the new settings.
The Home Hub 2 and Home Hub 3 have the settings in slightly different places. But you are looking for two settings:
- SSID - Also called the "Wireless Network" or "Wireless Network Name"
- Wireless security Key - This is called "Wireless Key" or "Wireless Encryption Key" depending on the level of software.
Depending on the version of software on your Home Hub it may look different. On mine it was under Settings-Advanced Settings->Wireless. The Home Hub 2 which I converted to an AP looked a bit different as shown below:
 |
| What the settings page looks like on the Home Hub 3 |
 |
| The configuration page on my home hub 2 where you set the SSID |
 |
| The wireless security page on my home hub 2 where you set the wireless security key |
DHCP
In order for two computers to "talk" to each other, they mainly use a protocol (bit like a language) called Internet Protocol (IP). One key aspect of this protocol is the IP address, normally represented as a set of 4 numbers separated by dots e.g. 192.168.1.254. In the internet at large these need to be unique, however, your home router does a conversion so that the addresses within you private home network don't need to be unique in the whole world. These non-unique addresses are only permitted in special ranges of addresses, one of the popular ranges is 192.168.???.???. Each device in your home, like your PC or smart phone, needs to have an address and needs to know the address of the "Gateway". The gateway is a special address to which all request outside the local network are sent to, in this case the router is the gateway. There are two ways that each of your computing devices get an address:
- You manually set the address of each device in your home, this is called a static address. This is not recommended unless you really know why you want to do it. I will explain one special case later on.
- You let the network automatically assign addresses, this is called Dynamic Addressing. The dynamic addresses are managed by something called a Dynamic Host Configuration Protocol (DHCP) server.
The good news is that your router has a DHCP server built into it. However, the bad news is that your old router that you plan to use as a AP also has a DHCP server. The AP isn't connected to the internet but it will pretend it is causing other devices to be unable to connect to the internet any more, so you need to turn it off otherwise it will fight the router. Do not change the DCHP settings on the Router only change the AP.
My BT router reserves a range of address for static allocation and a range for dynamic allocation. It is useful to allocate your AP a static address so that you can log in to easily in the future. So the first step is to check these details on you router, on my Home Hub 3 they were under Settings->Advanced Settings->Home Network->IP Addresses. As you can see it only dynamically allocates in the range 192.168.1.64 to 192.168.1.253 this means any address in the range 192.168.1.1 to 192.168.1.63 is free for static allocation (assuming the subnet mask is set to 255.255.255.0). If your settings are different then you need to do some research to work out the available static ranges, I am afraid it is too much to explain here. This also assumes you have not already been allocating static address to your devices. If you have already been doing static allocation I assume you know what you're doing already.
 |
| DHCP settings on the Home Hub 3 - Look but don't touch |
You don't need to change any of the settings in the router, what you need to do is go to the AP and change its settings. The settings were in the same place on my Home Hub 2 but the page looked a bit different. what you need to do is:
- Turn off the DHCP server - set enabled to "No"
- Assign it a Static IP address in the range permitted. In this example I have selected 192.168.1.5. This step is theoretically optional, you could let your router dynamically assign an address but it makes it easier if you assign a static address so that you can find your AP on the network in the future.
 |
| Setting the DHCP setting on the Home Hub 2 that will be the AP |
Once you change the IP address on the AP you need to go to the new address to log into it in the future.
Summary
So in summary:
- Connect up your old router (which will be the AP) where the WIFI is poor using a cable or Powerline adapter - DO NOT SWITCH IT ONE YET
- Log into your router and then do the following
- note down or change the following WIFI settings
- SSID
- Wireless security key
- note down the range of static addresses available for allocation
- Switch off the router
- Switch on the AP
- Log in to the AP and do the following:
- Set the SSID and Wireless Security key to the same as the router
- Turn off DHCP
- Set the Static IP address
- Switch on the router and enjoy enhanced WIFI coverage
HINT: if you have never done this type of thing before log into both routers first LOOK AT THE SETTINGS FIRST, then once you are happy you have found what you need then start making changes.
HINT Number 2 : If all else fails reset everything back to factory defaults. The Home hub have a reset to factory defaults process which will reset it to how it came out of the box. It might be a good idea to find the instructions for doing this and print them out before you break anything by accident (stopping your internet access).
Technical experts will note that I have made a number of simplifications in my explanations, please be gentle if you disagree. If this was useful to you please make a comment. if you want to suggest an improvement please comment.
DISCLAIMER
I have provided these instructions on a free basis in good faith, I have made best efforts to get them right and explain the steps. However, I make no guarantees, IF YOU MESS UP YOUR HOME NETWORK, YOU NEED TO FIX IT. You follow these instructions at your own risk.